Tutorial: Integrate Flutterwave into your Flutter app
Build a simple flutterwave payment feature for your flutter app
Table of contents
- PREREQUISITES
- STEP 0: CREATE A FLUTTER PROJECT
- STEP 1: ADD YOUR API KEYS TO YOUR PROJECT
- STEP 2: INSTALL THE NECESSARY PACKAGES
- STEP 3: CREATE YOUR CHECKOUT PAGE AND CARD
- STEP 4: IMPORT THE NECESSARY PACKAGES
- STEP 5: LOAD YOUR API KEYS
- DEEP DIVE
- STEP 6: CREATE FLUTTERWAVE PAYMENT FUNCTION
- VERY DEEP DIVE
- STEP 7: ADD THE FUNCTION IN THE ONTAP CALLBACK OF YOUR CHECKOUT CARD
- MORE
In this article, you are going to learn how to integrate Flutterwave into your Flutter app.
Flutterwave is a fintech company that provides a payment infrastructure for global merchants and payment service providers. A typical use case is a checkout system for an e-commerce solution in your flutter app.
PREREQUISITES
STEP 0: CREATE A FLUTTER PROJECT
If you already have a working app, please skip to next step 👇. If you don't, start by creating a new flutter project by running the following command in your terminal:
# terminal

$ flutter create flutter_flutterwave
This creates a "hello world" flutter app called "flutter_flutterwave". Open this folder in an editor of your choice.
STEP 1: ADD YOUR API KEYS TO YOUR PROJECT
It is very unsafe to expose your API keys in a project. It is OK to expose a public key from a cryptographic standpoint, but from a security standpoint, always take great care in protecting all keys to avoid theft and misuse. Therefore, create a .env file in your project's root folder and add your flutterwave public key to it.
# .\.env

PUBLIC_KEY=YOUR-FLUTTERWAVE-PUBLIC-KEY
Include the .env file in your pubspec.yaml to ensure that Flutter recognizes it. You can do so by adding it in the assets list like this:
# .\pubspec.yaml

assets:
  - .env
STEP 2: INSTALL THE NECESSARY PACKAGES
Add the flutter_dotenv and Flutterwave pub package to your pubspec.yaml file. You can do so by including it in the dependencies block like this:
# .\pubspec.yaml

dependencies:
  flutter_dotenv: ^5.0.2
  flutterwave_standard: 1.0.2
Then run the flutter pub get command in your project's folder. This would install the flutter_dotenv and Flutterwave SDK package in your project.
STEP 3: CREATE YOUR CHECKOUT PAGE AND CARD
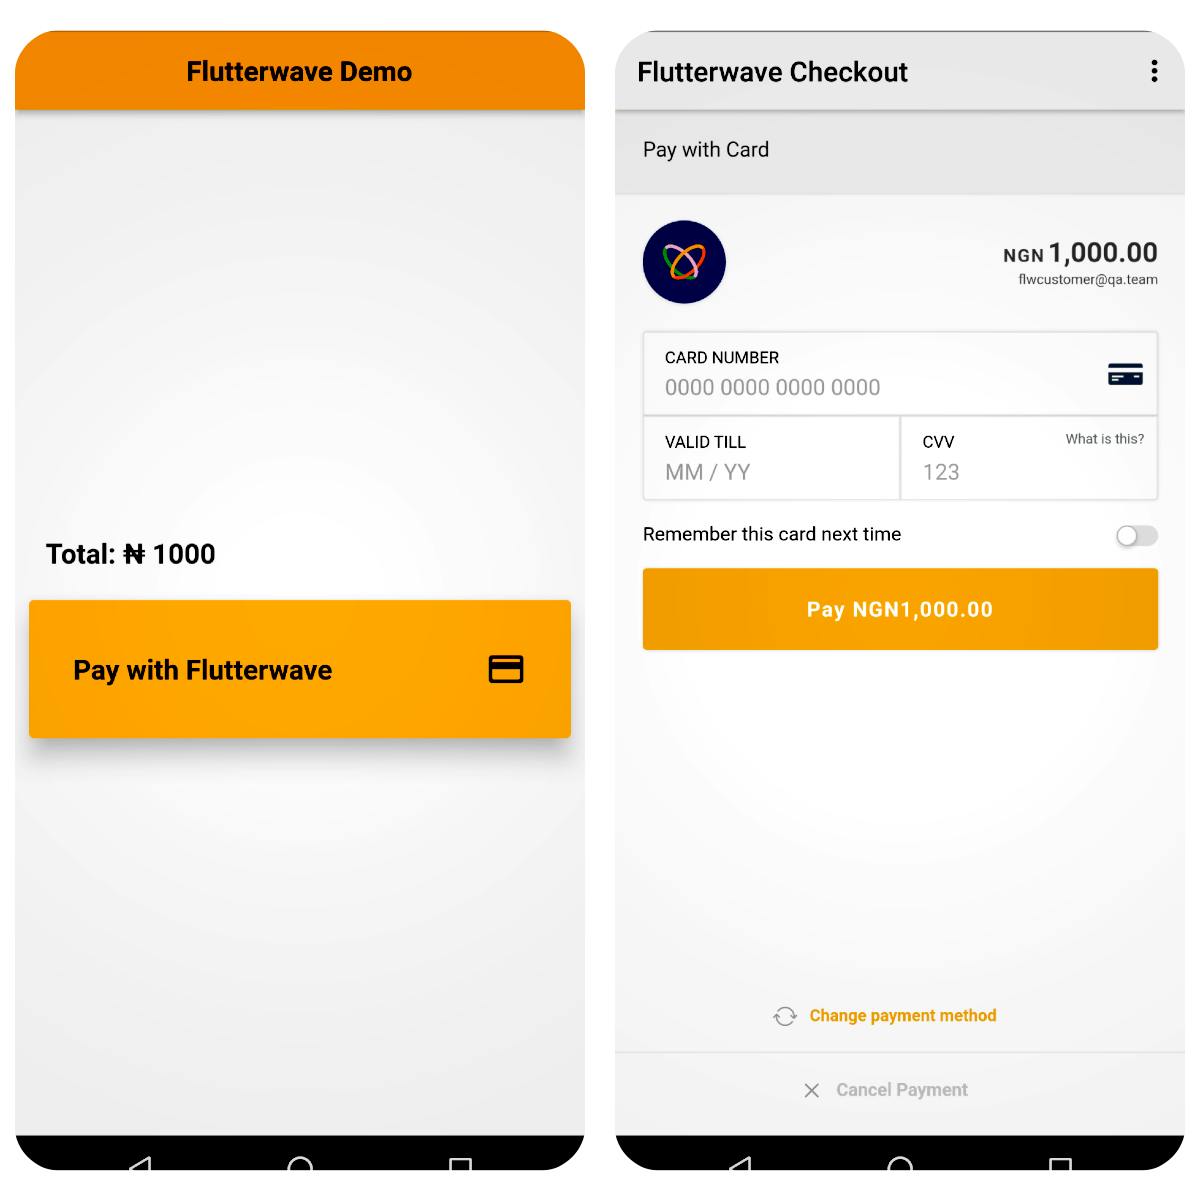
Create a simple checkout page with a "Pay with flutterwave" card. This will act as an interface for a user checkout action. A basic action card in flutter looks like this:
# .\lib\screens\checkout.dart

Widget CheckOutCard() {
    return InkWell(
      onTap: () {},
      child: Card(),
    );
  }
You can find the source code for the entire checkout page UI at this particular step 👉 here.
STEP 4: IMPORT THE NECESSARY PACKAGES
Connect the flutter_dotenv and Flutterwave packages to your project. You can use them by adding these lines to the top of your checkout page:
# .\lib\screens\checkout.dart

import 'package:flutter_dotenv/flutter_dotenv.dart';
import 'package:flutterwave_standard/flutterwave.dart';
STEP 5: LOAD YOUR API KEYS
Load the contents of your .env file with this code snippet.
# .\lib\screens\checkout.dart

void _loadDotEnv () async{
    await dotenv.load(fileName: ".env");
  }

@override
void initState() {
  super.initState();
  _loadDotEnv();
}
DEEP DIVE
This snippet creates a private async function called _loadDotEnv(). The function makes use of the flutter_dotenv package to load the environment variables in your .env file. By calling the _loadDotEnv function in the init state (start) of your checkout page, you can now access your API keys at "dotenv.env['PUBLIC_KEY']".
STEP 6: CREATE FLUTTERWAVE PAYMENT FUNCTION
Create a Flutterwave payment function in your checkout page.
# .\lib\screens\checkout.dart

final String amount = "1000";
final String txRef = "unique_transaction_ref_${Random().nextInt(100000)}";

void _makePayment() async {
    final style = FlutterwaveStyle(
        appBarText: "Pay with Flutterwave",
        buttonColor: Colors.orangeAccent,
        appBarIcon: Icon(Icons.payment_rounded, color: Colors.black),
        buttonTextStyle: TextStyle(
          color: Colors.black,
          fontWeight: FontWeight.bold,
          fontSize: 18,
        ),
        appBarColor: Colors.orange,
        dialogCancelTextStyle: TextStyle(
          color: Colors.redAccent,
          fontSize: 18,
        ),
        dialogContinueTextStyle: TextStyle(
          color: Colors.blue,
          fontSize: 18,
        )
    );

    final Customer customer = Customer(
        name: "FLW Customer",
        phoneNumber: "12345678910",
        email: "flwcustomer@qa.team");

    final Flutterwave flutterwave = Flutterwave(
        context: context,
        style: style,
        publicKey: dotenv.env['PUBLIC_KEY']!,
        currency: "NGN",
        txRef: txRef,
        amount: amount,
        customer: customer,
        paymentOptions: "ussd, card, barter, payattitude",
        customization: Customization(title: "Test Payment"),
        isTestMode: true);

    final ChargeResponse response = await flutterwave.charge();
    if (response != null) {
      print(response.toJson())
      if (response.success! && response.txRef == txRef) {
        ScaffoldMessenger.of(context).showSnackBar(snackBarSuccess);
      } else {
        ScaffoldMessenger.of(context).showSnackBar(snackBarFailure);
      }
    } else {
      ScaffoldMessenger.of(context).showSnackBar(snackBarFailure);
    }
  }
We have reached the crux of this article, please do not be overwhelmed 🙏🙏🙏. We are almost there!!!
VERY DEEP DIVE
This snippet creates a private async function called _makePayment().
- With the
stylevariable, we utilise the FlutterwaveStyle class to customise the look of our makePayment instance. It is not compulsory to include a style but to ensure uniformity of your app, please customise this to your taste. - With the
customervariable, we use the Customer class to define the customer we intend to charge. You should look to pass in these values dynamically in a public application. - With the
flutterwavevariable, we define a Flutterwave constructor that takes compulsory properties ofcontext(calling context),publicKey,txRef(unique transaction reference),amount(amount to be charged),customer,currency(currency to debit in),paymentOptions(different payment options offered by Flutterwave),customization(business logo, description and title on the modal) andisTestMode(Flutterwave account mode).
P.S: The txRef MUST be unique. The flutterwave instance will not load the flutterwave payment modal if you pass a reference that has already been paid with. In this tutorial we make use of the dart:math library to generate a random number. More stringent options can be exercised. You should also set isTestMode to false if you're using a live flutterwave account.
- The
responsevariable returns a future of ChargeResponse after calling the flutterwave object with a.charge()method. A successful response looks like this:{status: success, success: true, transactionId: 3507966, txRef: unique_transaction_ref_964300}response.successis true andresponse.txReftallies with ours, it is, and we can provide value to the customer [e.g. navigate to a new page, call an endpoint, write to a database, etc. ]. This tutorial just displays a Snackbar.
STEP 7: ADD THE FUNCTION IN THE ONTAP CALLBACK OF YOUR CHECKOUT CARD
# .\lib\screens\checkout.dart

Widget CheckOutCard() {
    return InkWell(
      onTap: () {
        _makePayment();
      },
      child: Card(),
    );
  }
This will ensure the payment function is called once your action card is clicked.
Voila!!!
 You have just built a payment app and can start receiving funds !!!

Feel free to download/clone the full source code from 👉here.
You can also check out the live demo of this tutorial 👉here
If this helped or you enjoyed this article, leave a like/share to help someone too. Thank you !!!
MORE
I have added a list of flutterwave test cards you can use to test your payment app. These cards will only work if you are using a flutterwave test account i.e isTestMode: true. Find them 👉here.
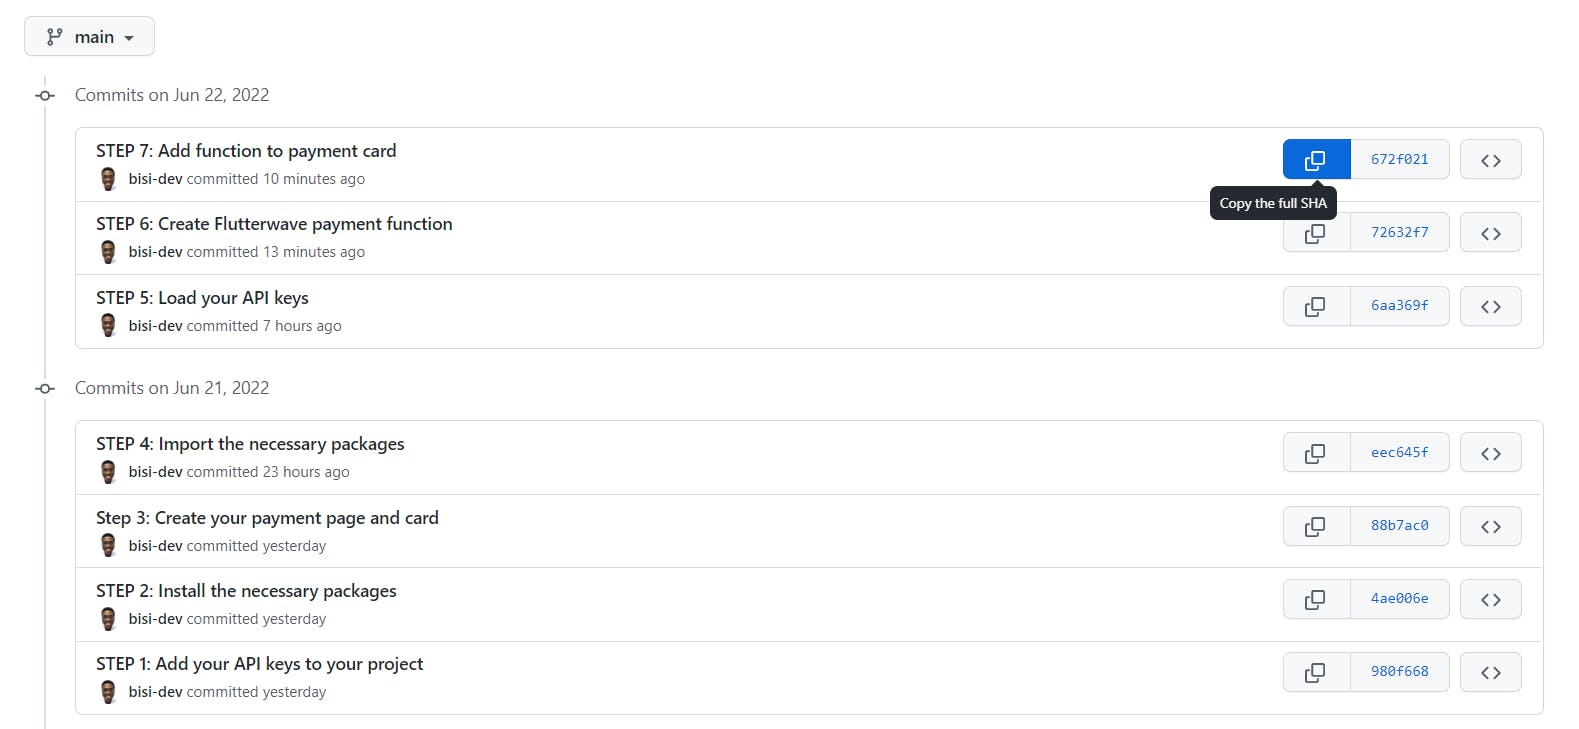
I have also included each step as a commit in this GitHub 👉repo.

# terminal

$ git clone https://github.com/bisi-dev/flutter_flutterwave.git
$ cd flutter_flutterwave
$ git reset --hard <commit-SHA>
You can also leave questions/comments. I will duly respond. Thank you !!!
